レジン3Dプリントにおけるテストモデルとは何ですか?
何ヶ月も待ち続けた樹脂 3D プリンターをついに手に入れることができました。素晴らしいですが、次は何でしょうか?興奮して、すぐにプリンターの電源を入れて、お気に入りの 3D モデルを印刷する準備を始めたくなるかもしれませんね?まあ、それほど速くはありません。
樹脂 3D プリンタを初めて使用する場合は、 樹脂 3Dプリントであろうと FDM 3D プリントであろうと、3D プリントが一部の人が暗示するほど簡単ではないことに驚かれるかもしれません。結局のところ、完璧な 3D プリントは、プリンター、樹脂の特性、およびそれらがプリント環境とどのように相互作用するかについての理解の組み合わせによって決まります。

樹脂 3D プリンティングの難解な用語が満載のページ数に及ぶユーザー ガイドに慣れたら、いよいよ初めての 3D モデルを決定するときです。おそらく、最初の直感は、これらの 3D プリント Web サイトを検索して、プリントする最もクールなモデルを見つけることでしょう。それは間違いではなく、間違いなくすぐにそこに到達しますが、実行する必要があるもう 1 つのステップがまだあります。
ほとんどの専門家は、新品の樹脂 3D プリンタで最初に印刷する必要があるのはテスト モデルであることに同意するでしょう。 3D プリント テスト モデルを使用すると、樹脂の特性と機能、およびさまざまなプリント環境でのパフォーマンスをより深く理解できます。設計者は、寸法精度、プリントのオーバーハング、スライサーの設定など、樹脂とプリンターのさまざまな構造的側面を観察できるように、さまざまな 3D プリント テスト モデルを作成しました。これらの側面を理解することで、プリントを成功させる可能性が高まり、失敗したモデルでレジンを無駄にすることを避けることができます。
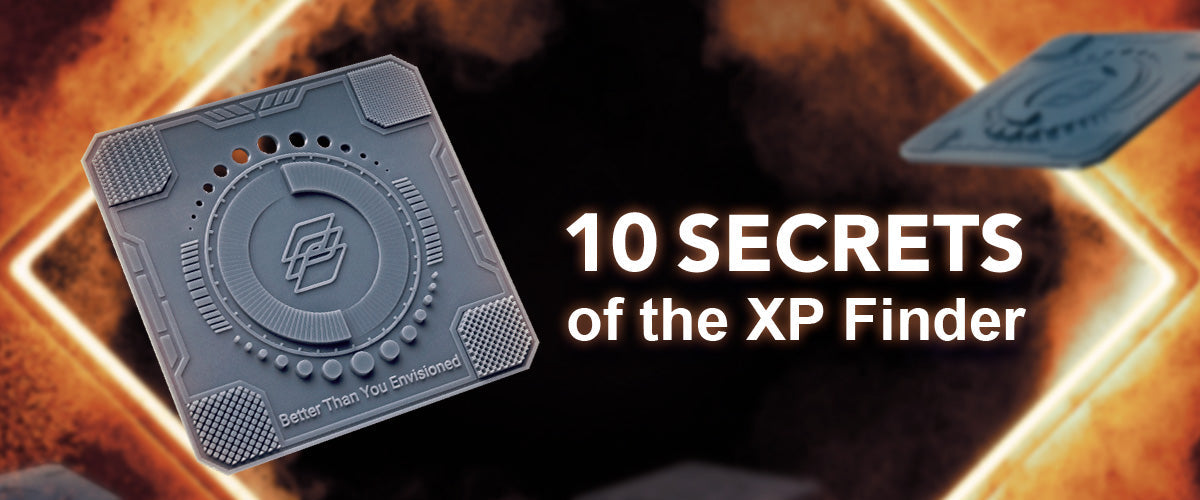
XP ファインダー
この記事では、樹脂の露出とパラメータ設定をテストするために Phrozen によって設計された 3D プリント テスト モデルであるXP Finderを紹介します。 XP Finder は、最小限の樹脂で 30 分以内にプリントできるため、3D プリントを開始するための優れた 3D プリント テスト モデルです。
XP Finder は、当社の Web サイトまたはPIXUPからいつでも無料でダウンロードできます。次に、Chitubox や Lychee などの選択したスライサー プログラムを実行し、印刷に使用する樹脂とプリンターを選択します。スライスして印刷します。印刷されたオブジェクトの後処理に関する完全なチュートリアルについては、 「樹脂 3D プリントを完璧にクリーニングする方法」に関する投稿をご覧ください。

XP Finderの解釈
他のすべてのテスト モデルと同様、 XP Finder の結果は、その意味を理解しなければ意味がありません。したがって、この記事では、 XP Finderの各部分とそこから学べることについて説明します。
名前が示すように、 XP Finder (または Exposure Finder) は 3D プリント テスト モデルで、デザイナーやクリエイターが露出設定を確認できるようにするとともに、さまざまなテクスチャが画像上でどのように機能するかについてのアイデアを提供するために、10 の異なるパーツで設計されています。特定の樹脂。
1.「想像以上に良かった」

まずは下部のテキストから始めましょう。会社のモットーを捉えて、各文字を一定の間隔で完璧に印刷する必要があることがわかります。 Envisioned の「i」の文字に注目してください。ドットがストロークと結合すると、モデルは露出オーバーになります。一方、テキストの一部が欠けていたり、十分に目立たない場合は、露出不足になります。
2. 柱

文字の真上に、突き出た柱が見えます。柱の間には一定の距離があり、合計 13 本の柱が必要です。柱が大きく見え、ギャップが一貫していない場合は、 XP Finder が露出オーバーであることを示しています。ただし、小さな柱の一部が欠けていたり、十分に突き出ていなかったりすると、露出不足になります。
3. 円形の坂道

Phrozen ロゴを囲む傾斜は、レイヤーの高さ設定のパフォーマンスをチェックするためのものです。樹脂 3D プリントではレイヤーの高さに依存してディテールを作成するため、傾斜面でのスライスが増えれば増えるほど、オブジェクトのディテールをより多く得ることができます。レイヤーの高さを低くすると、モデルのディテールを増やすことができますが、印刷時間も長くなります。
4. サイドパネル

パネルは全部で 14 枚あり、できるだけ結合せずに印刷する必要があります。完璧な露出では、間にわずかに突き出たパネルがあり、規則的で一貫したスペースが存在します。パネルが結合すると、 XP Finder が露出オーバーになります。ただし、端のパネルが欠けている場合は、露出不足になります。
5. フレームライン

テスト モデルを囲む連続した細い線があります。 XP Finderの左側と右側に注目し、これらの側面に線が大きく見えるかどうかを確認します。線が欠けている場合、3D プリント テスト モデルは露出不足です。ただし、ライン付近の 3 つのボードが結合すると、露出オーバーになります。
6. フロゼンのロゴ

完璧な露出で印刷すると、 XP Finderの中央にあるロゴは、真ん中に穴があり、比較的一定した線の太さが表示されます。線が細く見え、中央に大きな空白がある場合は、露出不足です。逆に、露出オーバーの場合は、線が融合して中央の穴を覆います。
次の 4 つのパートは、それぞれの樹脂で印刷したときにさまざまなテクスチャがどのように見えるかを視覚化するのに役立ちます。多くの 3D プリンティング モデルは、レジン プリンターの機能を誇示するために非常に詳細なテクスチャや複雑な記事を表示しているようですが、 XP Finder では、これらのテクスチャがどのようにプリントされるかを事前に表示して、プリントする予定のモデルに適切なレジンを確実に入手できるようにすることができます。 。ラインに大量のレジンを塗る前に、つま先を浸すのが安全な方法です。
7.布の質感

XP Finderの左上隅では、布のテクスチャと、特定の樹脂を使用したこのパラメータ セットの下で実際のモデル上で布のテクスチャがどのように見えるかをシミュレートします。
8. 武器のテクスチャ

右上隅にある非常に詳細なグリッドは、大砲のバレルや銃のハンドルなどの武器のテクスチャをシミュレートします。
9. 爬虫類の皮膚の質感

左下隅には、爬虫類の皮を模した突き出たグリッドが表示されます。このテクスチャは、ファンタジーのモンスターやドラゴンを印刷するときによく表示されます。
10. ジュエリーのテクスチャ

最後に、右下隅には、指輪やネックレスなどのジュエリーの質感を模倣した彫刻の詳細が表示されます。
実際のモデルを印刷する前に、必要に応じてパラメーター設定を最終確認し、微調整してください。失敗したプリントで樹脂を無駄にしないように、大きなモデルをプリントする前に、完璧なXP Finder露光が達成されていることを確認することが最善です。また、3D プリント テスト モデルから取得したレイヤーの露光時間を、実際のモデルの場合は少なくとも 10%、12cm を超えるモデルの場合は最大 20% 増やすことをお勧めします。これにより、モデルが建築プレートにしっかりと貼り付き、硬化するのに十分な時間が確保されます。
XP Finder は樹脂とプリンターの組み合わせに最適な露光時間を見つけるのに役立ちますが、樹脂のパフォーマンスをより深く理解するのに役立つRP Testerなどの他の 3D プリント テスト モデルもあります。さらに、 ThingiverseやCultsなどの 3D プリント モデルの Web サイトでさらに多くのテスト モデルを見つけて、より多くのパラメータをテストし、樹脂の性能についての理解を深めることもできます。
Phrozen XP Finder をダウンロードして、今すぐ印刷を始めましょう!



10 コメント
Joe
You seem to have talked about every other item on the model but not the holes… As you’ve gone to the trouble of including holes in the model, I’m surprised that you have not mentioned how significant they are?
Frustratingly, my model seems to have printed perfectly apart from the holes. The large hole in the middle is there, as are the 2 holes either side of it, but they’re not clean holes, the sides are a bit tapered.
Any ideas?
———
Phrozen Technology replied:
Hello Joe, Thank you for commenting.
The holes you mentioned on the top of the round part in the middle cannot be printed clean is because when printing the XPFinder directly to the plate (which is what it intended to be), the ‘bottom layer’ setting are applied to the few first layers of your model.
The bottom layer setting are meant to be overexposed to ensure the adhesion of the model to the plate, and because it’s overexposing, the area resin cured will exceed the designed shape, that’s why you are seeing the holes being blocked with some cured resin and may not having the shape all the way through the bottom.
If you are seeing the top side of the holes holding their circular shape well, and having proper spacing in the middle P shape of the Phrozen logo, as well as the textures around four corners, you are probably fine with your exposure.
If you really want to see the hole punctured all the way through, you can decrease the bottom layer exposure gradually during the testing, and you may print out a XPFinder with the holes fully punctured, if it doesn’t falls off from the plate or having issue on the adhesion to the plate.
Remember, the sole purpose of the bottom layer exposure is to make sure the model adhere to the plate. As long as the model’s holding there tight, you can have as low amount of timing for bottom layer exposure as you like. That being said, when printing with a printer that’s properly calibrated, if the model keep falling off from the plate, insufficient of bottom layer exposure can be one of the reason of this happening.
Hope this helps.
Best, Phrozen Team
>
jaeinlee
I have a Mighty 12k and a Revo 14k printer
If you print it out with an aqua8k resin, there’s always a small hole at the top
Please give me a solution
———
Phrozen Technology replied:
Hello jaeinlee,
Thank you for commenting.
Based on your description, although we don’t have a photo to confirm the issue with absolute certainty, it sounds like you are experiencing what is commonly referred to as a “bubble.” This issue occurs when, due to the viscosity of the resin, temperature effects, or the speed at which the build plate moves, the resin does not flow back into place before UV exposure. As a result, the edges solidify while the center remains resin-free, leaving a hole.
To address this, you can try the following adjustments:
1. Increase the resting time after the build plate returns to allow the resin to flow back into position before the next layer is exposed. 2. Reduce the speed of the build plate’s return movement to minimize turbulence and ensure proper resin flow.These adjustments should help resolve the issue.
Hope this helps.
Best, Phrozen Team
>
Victor
My whole print is shallow. Dimensions and sharpness is as it should be. Did upgrade to the ACF film immediately. Could you help me explain why this is happening as this is not in your explanation.
———
Phrozen Technology replied:
Hello Victor, Thank you for commenting.
If by “shallow” you mean the model is thinner or compressed, it indicates that the distance between the Z-axis platform and the LCD is too close. Please recalibrate the platform, and if necessary, use 2-3 sheets of paper during calibration. If you are referring to unclear texture or engravings on the model, you may need to increase the normal layer exposure time.
Additionally, please note that the recent colder weather can affect printing results. The resin parameters listed on our website are measured at a stable temperature of 25°C. If maintaining a consistent indoor temperature of 25°C is not possible, the exposure time may need to be extended due to lower ambient temperatures.
Hope this helps.
Best, Phrozen Team
>
mieydee
i test this xp finder from 2.0s exposure untuk 1.3s exposure time but the hole on top still filled,
I’m user bottom layer 25, stick well and easy remove.
bottom layer count 5
Layer height 0.05mm
but still not finding the perfect setting, its oke to down to 1s exposure? I’m using m7pro anycubic
———
Phrozen Technology replied:
Hello mieydee, Thank you for commenting.
The filling of the holes is most likely due to the bottom layer exposure being overexposed, which is normal since the bottom layers are meant to grab the plate instead of reproducing proper detail of the model.
Hope this helps.
Best, Phrozen Team
>
Randal
Should the FX finder be printer with supports under it or direct into the bed with no supports.
If printing direct onto the bed wouldn’t the Bottom layer higher exposure setting influance the result?
———
Phrozen Technology replied:
Hello Randal, Thank you for commenting.
XPFinder can be print onto the plate directly. The exceed amount time of bottom layer exposure will only affects the holes on the top. You can freely adjust the bottom layer exposure to make the result easier to read, as long as you can still get the model adhere to the plate and be able to take it off easily.
Hope this helps.
Best, Phrozen Team
>
Ali Farzaneh
Hello , I have a problem with my prints dimension and need a test to calibrate my machine , What test do you suggest for this application?
Thanks
———
Phrozen Technology replied:
Hello Ali, Thank you for commenting.
For dimensional accuracy, we’d suggest testing models such as AmeraLabs Town, or the Boxes of Calibration by J3DTech. J3DTech has provided a detailed guide on resin printing, which includes the calibration part that we suggest you to take a look: https://docs.google.com/document/d/1Z8fkzOxEgI9sOTwDKI6CeblpnuP4V8ayYVwZrYGmo44/
Hope this helps.
Best, Phrozen Team
>
Leigh
What should the holes look like
———
Phrozen Technology replied:
Hi Leigh,
Thank you for your question. Ideally, the holes on your printed objects should appear clean with clear edges after the cleaning and post-curing process. If you encounter difficulty in maintaining fully punctured holes without underexposing, especially the smaller ones, it could be a characteristic of the resin you are using.
Best regards, Phrozen Team
>
Angie Minnie
Hello- I have the mighty 8k. My prints are underexposed. How do you adjust the exposure? in the printer, or the software (chitubox)?
———
Phrozen Technology replied:
Hello Angie, Thank you for commenting.
You should adjust your resin setting in your slicer software. Here’s a reference for adjusting setting in slicer software: https://helpcenter.phrozen3d.com/hc/en-us/articles/18942575517977-How-to-Print-Your-3D-Files-With-CHITUBOX
Hope this helps.
Best, Phrozen Team
peter
good clear explanation of what to look for
good clear explanation of what to look for
Joska Paszli
Imo would be better if there was an option where to look to solve a thing when bad.
———
Phrozen Technology replied:
Hi Joska, As the XP Finder is made to check your exposure, when you realize that your models are overexposed, you can easily fix it by reducing your exposure time. In the opposite, if you models are underexposed, simply increase your exposure time. Remember to increase it gradually until you find that sweet spot! Hope this helps!
Cheers, Phrozen Team
>